
Gambar 01 Rangkaian Lcd 16x2 Dengan Arduino Uno Images
The begin () function initializes the LCD screen interface and specifies the display's dimensions (columns and rows). For a 16×2 character LCD, the parameters should be 16 and 2; for a 20×4 LCD, the parameters should be 20 and 4. In the loop, the print () function is used to display "Hello world!" on the LCD.

Gambar 01 Rangkaian Lcd 16x2 Dengan Arduino Uno Images
A 16×2 LCD is a type of alphanumeric display that can display 16 characters per row and 2 rows. It is commonly used in various electronic devices such as calculators, digital clocks, and small embedded systems to display text and numbers. The "16×2" specification refers to the number of characters that can be displayed on the screen, with.
Schematic for 16x2 i2c LCD example with Arduino
Tutorial Arduino Simulasi Mengakses LCD 16×2 I2C Proteus 8. di artikel kali ini saya akan memberikan rangkaian I2c LCD di Proteus, dan program arduino untuk I2c lcd di proteus. Sebenarnya program arduino nya tidak berbeda dengan kita melakukan langsung pada hardware namun dengan simulasi kita tau dan dapat memahami rangkaian I2C lcd dengan.
Como ligar um display LCD 16x2 I2C no Arduino Uno
LCD text dibedakan berdasarkan ukuran display, yaitu jumlah kolom dan barisnya. Ada LCD 20×4 (20 kolom 4 baris), LCD 8×2 (8 kolom 2 baris) , LCD 16×2 (16 kolom 2 baris). Semuanya mempunyai pin koneksi yang sama yaitu 16 pin dibagian atas LCD. Tidak semua pin LCD yang jumlahnya 16 pin dihubungkan ke Arduino, cukup beberapa saja : 1. Vss (Gnd) 2.

1. LCD 16x2 dengan Arduino uno TEKNIK ELEKTRO
This is a comprehensive guide for Arduino LCD (Liquid Crystal Display) Interfacing. You'll learn how to use 16×2 LCD with Arduino and create some example projects to practice what we'll be learning in this tutorial. We'll implement the following examples in this tutorial: Arduino 16×2 LCD Text Display. Arduino 16×2 LCD Variables Display.

Arduino Lcd 16x2 Tutorial Interfacing 1602 Lcd Display With Arduino Images
16x2 LCD Module Pinout. The 16x2 has a 16-pin connector. The module can be used either in 4-bit mode or in 8-bit mode. In 4-bit mode, 4 of the data pins are not used and in 8-bit mode, all the pins are used. And the connections are as follows: And here are the pins and corresponding functions. Ground Ground (0V)

Rangkaian Lcd 16x2 Arduino
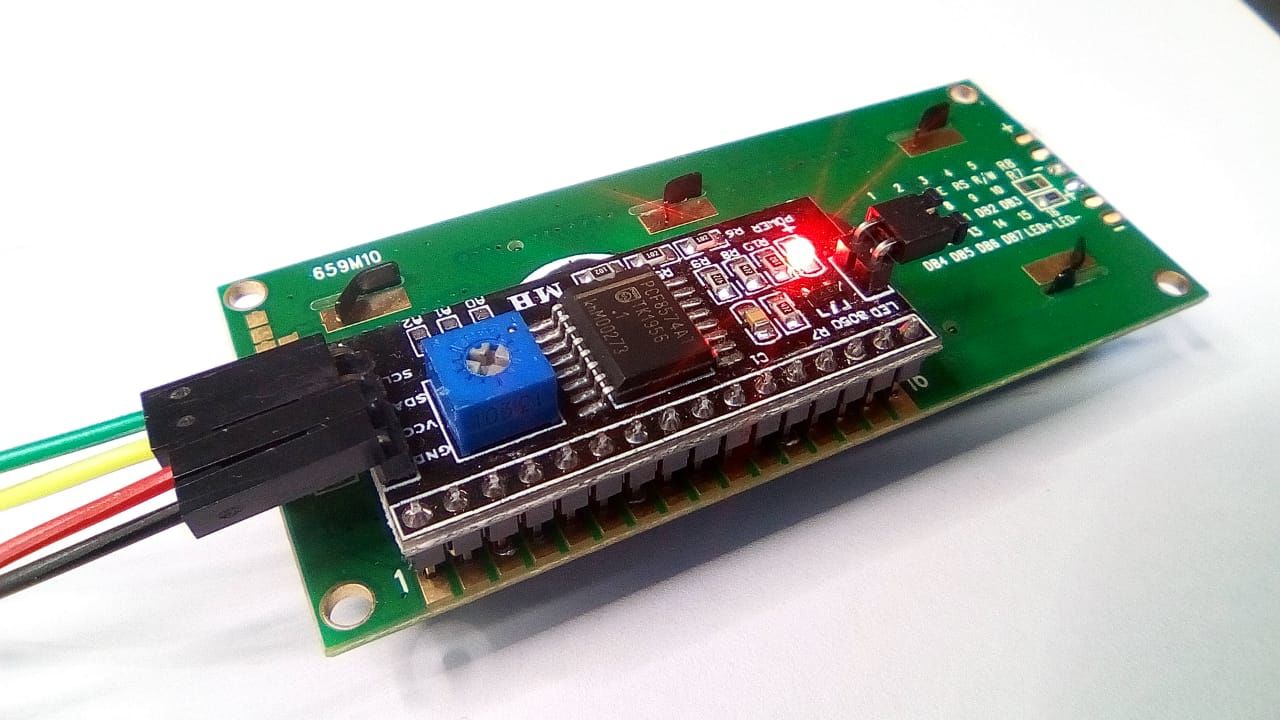
In the realm of Arduino projects, integrating displays is a common and rewarding endeavor. One particularly versatile choice is the 16x2 LCD (Liquid Crystal Display) with an I2C (Inter-Integrated Circuit) interface. This guide will walk you through the seamless process of connecting a 16x2 I2C LCD display to your Arduino, offering a convenient solution for

How to Interface LCD (16X2) to Arduino Instructables
16X2 LCD pinout diagram. In this picture down below you will see a 16X2 LCD pinout diagram and the pin configuration. VCC: the power supply of the 16×2 LCD connected with a 5V pin in Arduino. VEE (LCD Contrast): to control the 16×2 LCD contrast and brightness by using a potentiometer.

Conectar Lcd 16x2 A Arduino Uno Descargar Video
RFID CARD READER WITH ARDUINO,RFID-RC522 and LCD 16x2: Radio-frequency identification (RFID) uses electromagnetic fields to automatically identify and track tags attached to objects. The tags contain electronically stored information. Passive tags collect energy from a nearby RFID reader's interrogating….
Rangkaian Lcd 16x2 Arduino
arduino. This code is the same as the example code in the LCD library. It can be found in the Arduino IDE here: File > Examples > LiquidCrystal > HelloWorld. 1 /*. 2 LiquidCrystal Library - Hello World. 3 4 Demonstrates the use a 16x2 LCD display. The LiquidCrystal. 5 library works with all LCD displays that are compatible with the. 6 Hitachi.

Arduino,LCD 16x2 dan DS3231 Belajar Arduino Tutorial Arduino Anak Kendali
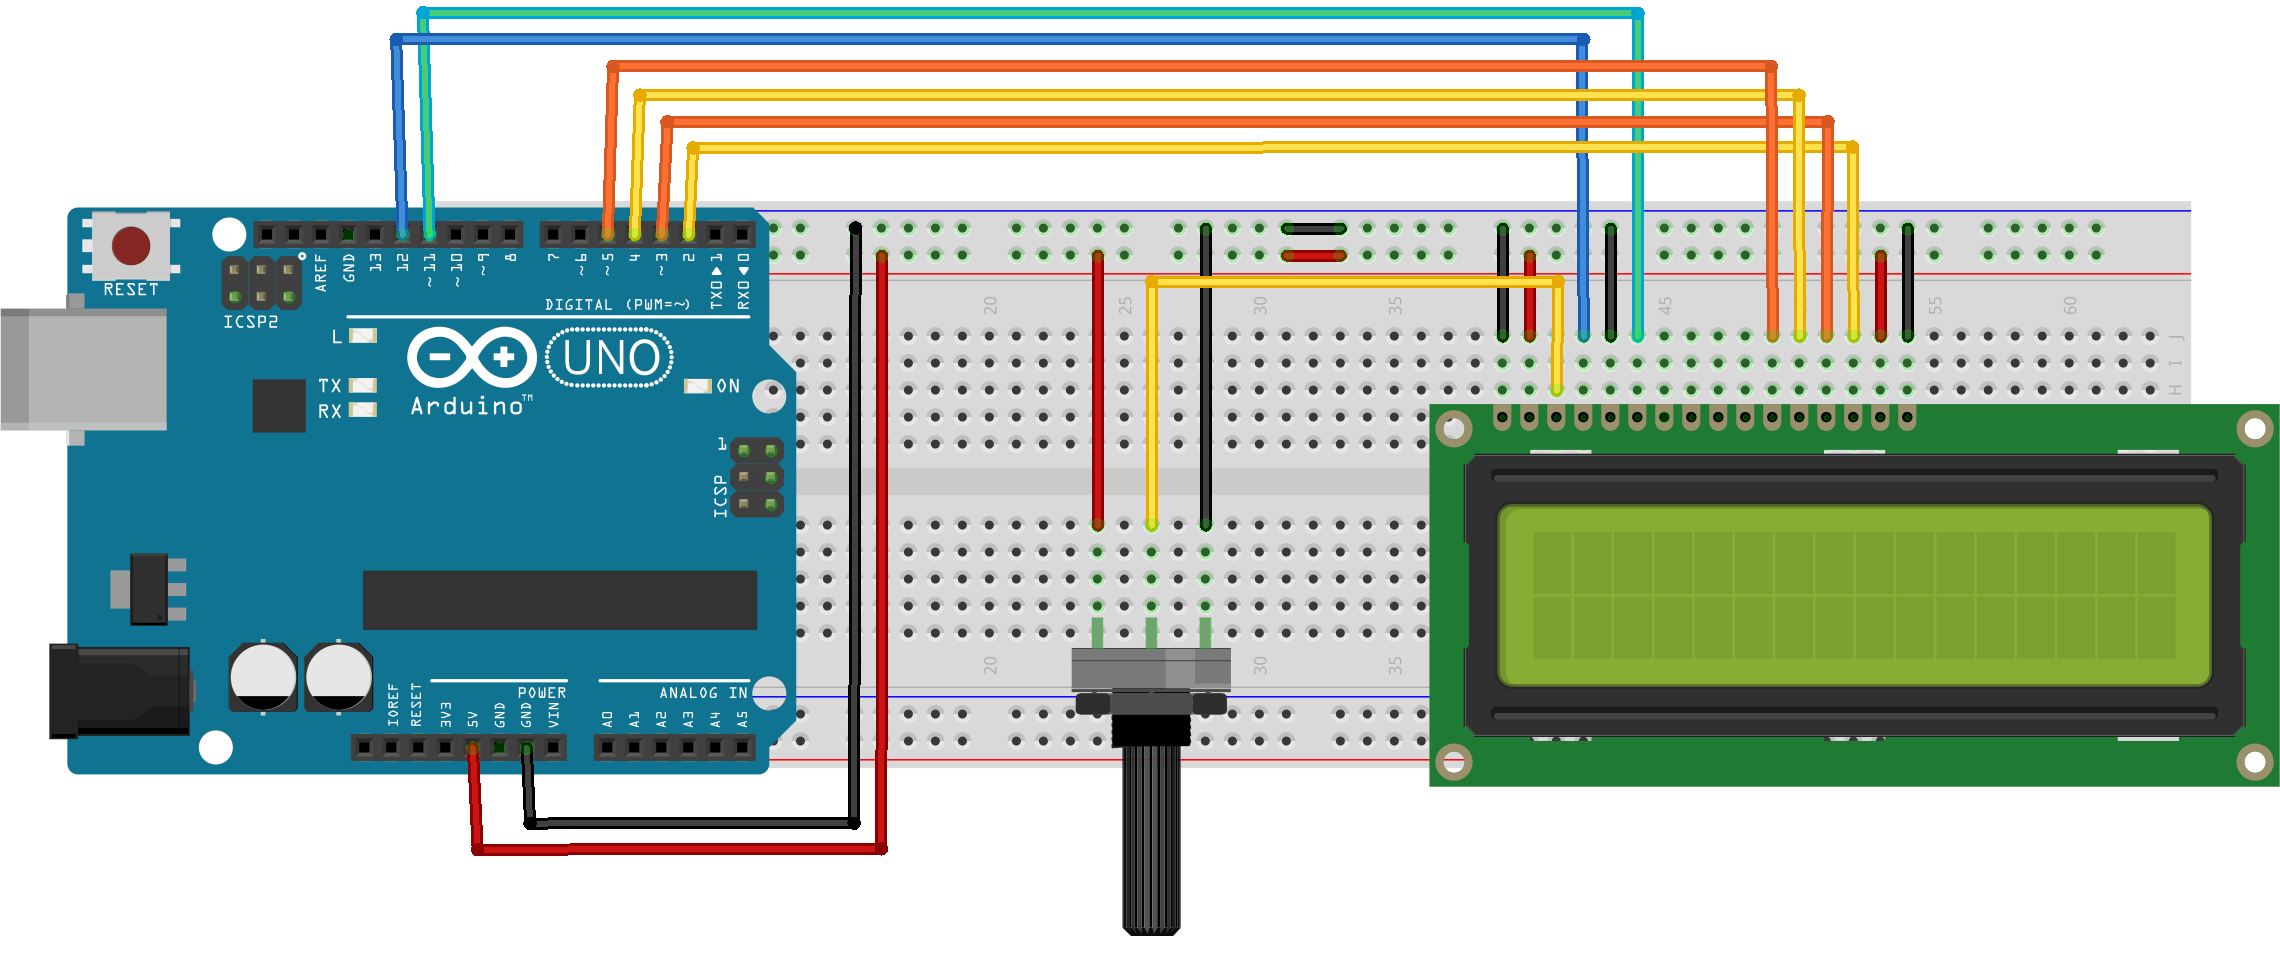
Interfacing 16×2 LCD With Arduino. The 16×2 LCD has 16 pins. We need to connect the LCD pins to the Arduino pins as follows: VSS pin of the LCD to the GND of the Arduino. VDD pin of the LCD to +5V of the Arduino. V0 pin of the LCD to the center pin of the potentiometer. Connect the RS pin of the LCD to the digital pin 12 of the Arduino.

Gambar 01 Rangkaian Lcd 16x2 Dengan Arduino Uno Images
To manage the 16×2 LCD screen in the programme, the library used is LiquidCrystal.h whose functions are as follows: LiquidCrystal lcd (rs, en, d4, d5, d6, d7) to define the 4bits communication. lcd.begin (16, 2); to intialize the screen. lcd.print () to display an ASCII character string. lcd.write () to display data, one byte at a time.
Circuito Arduino Uno Lcd 16x2 I2c Lcd Arduino Projetos Arduino Arduino Images
Arduino - LCD I2C. In this Arduino LCD I2C tutorial, we will learn how to connect an LCD I2C (Liquid Crystal Display) to the Arduino board. LCDs are very popular and widely used in electronics projects for displaying information. There are many types of LCD. This tutorial takes LCD 16x2 (16 columns and 2 rows) as an example.

(PDF) Code for Simplified Connections of 16x2 LCD Display with Arduino UNO
Simulation of JHD-2X16-I2C I2C LCD 16x2 with Arduino in Proteus.#arduino #proteus #lcd #i2c

Cara Program Lcd Karakter 16x2 Menggunakan Arduino Dan Simulasi Proteus Vrogue
The 4-bit mode requires seven I/O pins from the Arduino, while the 8-bit mode requires 11 pins. For displaying text on the screen, you can do most everything in 4-bit mode, so example shows how to control a 16x2 LCD in 4-bit mode. Hardware Required. Arduino Board; LCD Screen (compatible with Hitachi HD44780 driver)

How to connect Arduino + 74HC595 + LCD 16×2 alp tuğan
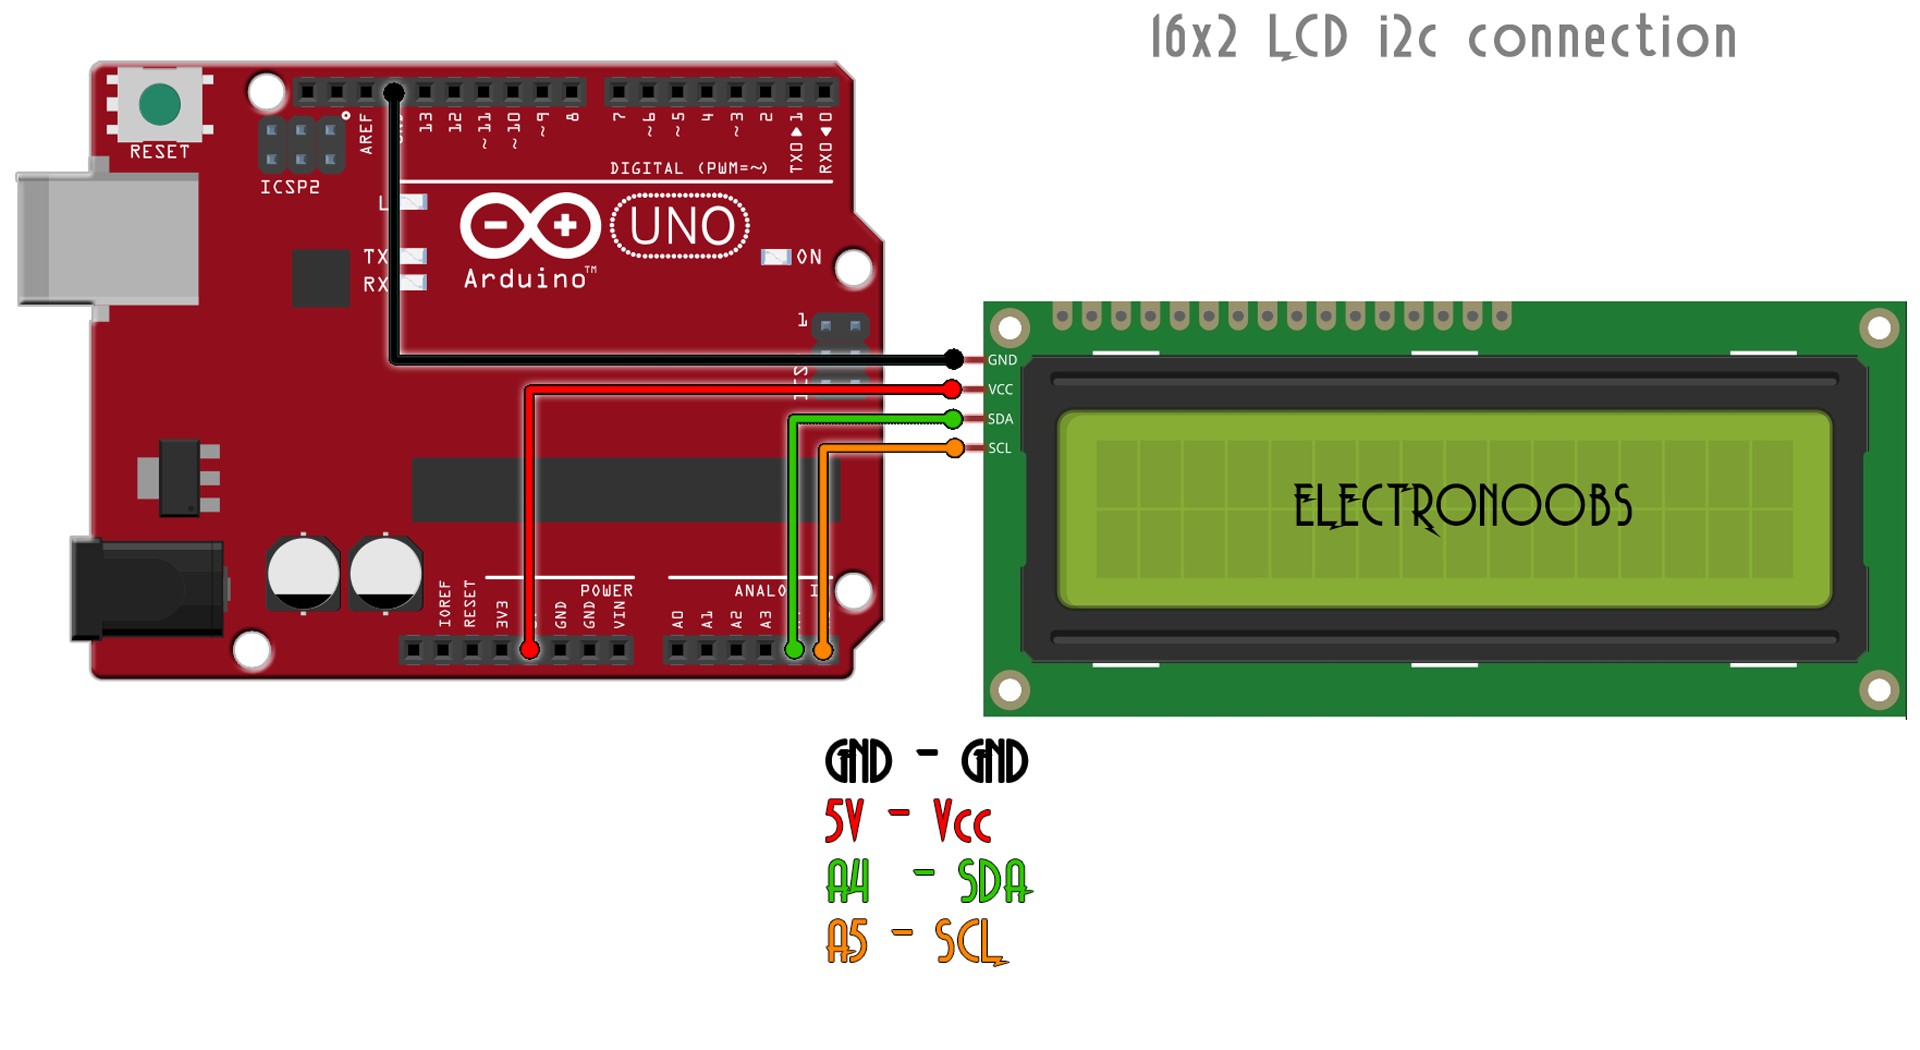
Arduino BELI. LCD 16×2 dan I2c BELI. Kabel jumper Male-Female BELI. Kemudian silahkan rangkai seperti gambar dibawah ini: CATATAN: Hubungkan pin VCC pada LCD i2C ke pin 5V Arduino. Hubungkan pin GND pada LCD i2C ke pin GND Arduino. Hubungkan pin SCL pada LCD i2C ke pin SCL (atau bisa pake pin A5) Arduino. Hubungkan pin SDA pada LCD i2C ke pin.