
Adobe premiere pro cc 2018 tutorial kasertoday
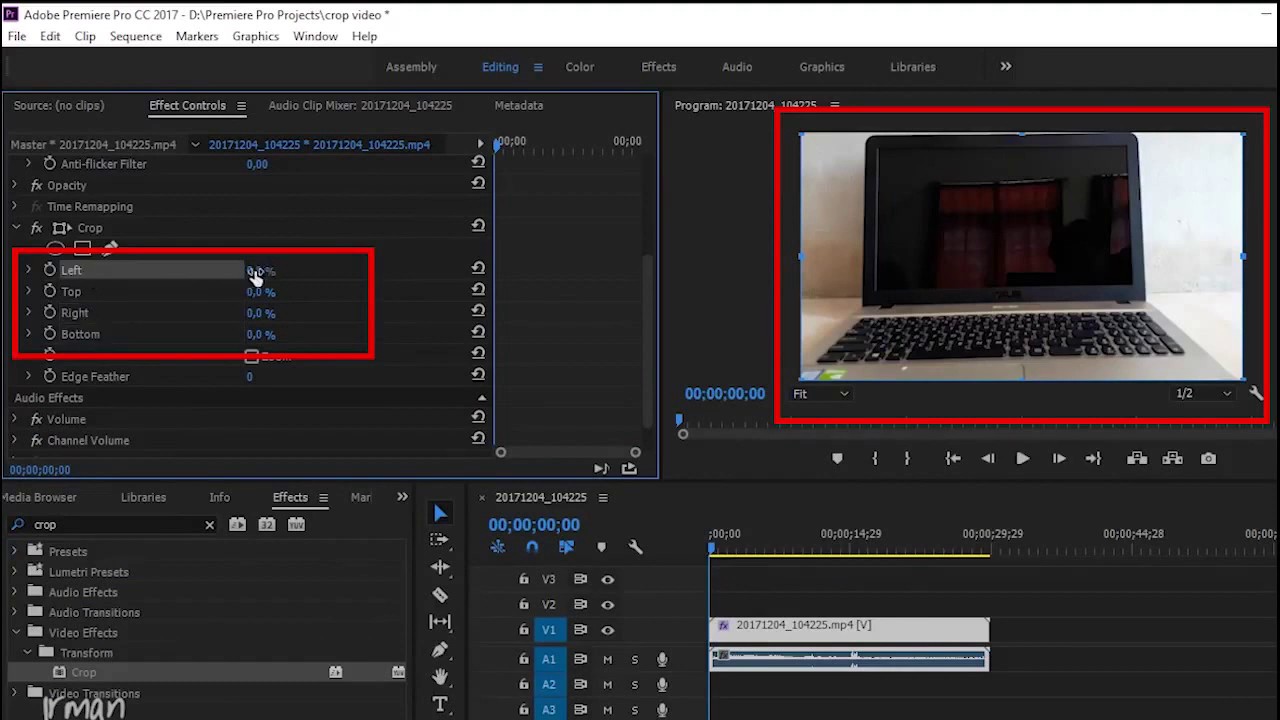
In the Effects panel, search for "crop" or go to Video Effects › Transform › Crop. Double-click the Crop effect to apply it to the selected clip. 3. Crop your clip. Select the Crop effect in the Effect Controls panel and then drag the handles in the Program Monitor to crop your video. You can also adjust the numeric controls to make a.
Save preset adobe premiere skillpolre
In this short Adobe Premiere Pro 2019 tutorial we will show you how to easily Render Export and Save a video in Premiere Pro CC 2018 ( this will also work on.

5 Time Saving Video Editing Tips in Adobe Premiere Pro CC ( Tutorial / How to) YouTube
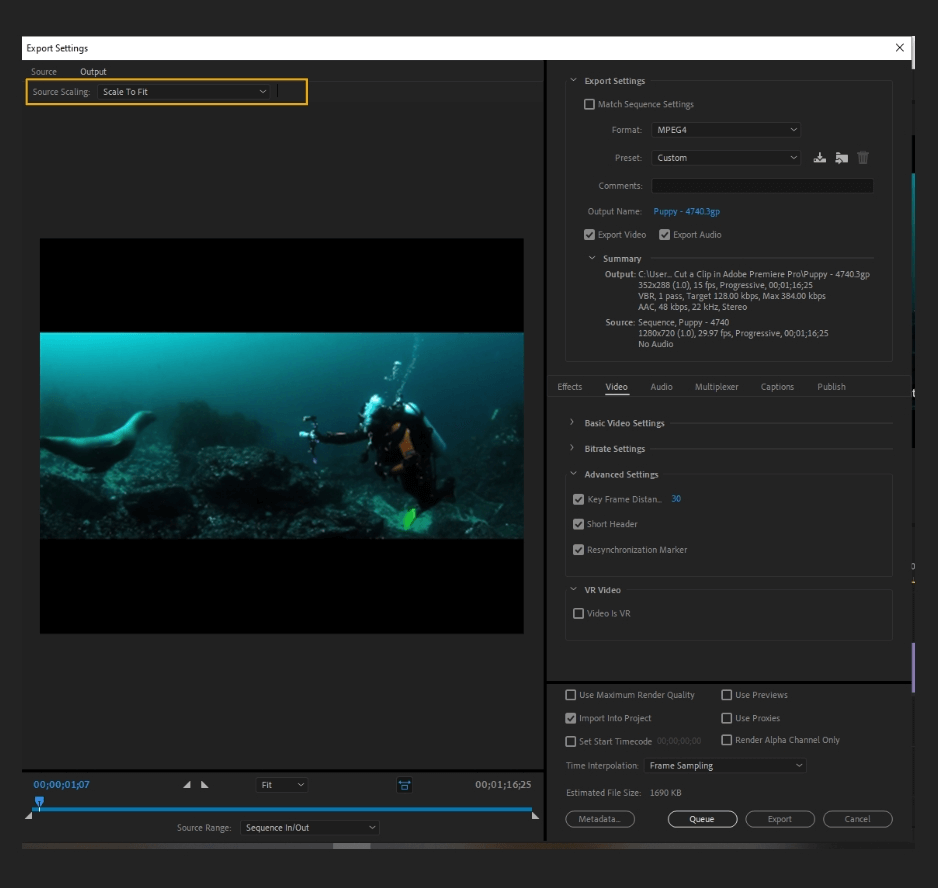
Choose Export from the header bar at the top of Premiere Pro to open the Export workspace. You can also choose File > Export > Media or use the Cmd/Ctrl + M shortcut to switch to Export Mode. The export workflow moves from left to right. Start by selecting a destination for your video from the choices in the left-hand column, such as TikTok.

Cara membuka file save adobe premier cc 2019 di Adobe premier CC 2018 Tutorial episode 1 YouTube
Click Share in the top toolbar.; Click Local.; Add the Filename and choose a location to Save to.; If you have a specific video requirement, you can tweak the advanced settings. For more information, see Advanced Settings.; Preview your video before you render and save it on your device.

How to Export Adobe premiere pro to MP4 YouTube
Cara Save Video di Adobe Premiere. Ketika pertama kali menggunakan aplikasi Adobe Premiere pastinya masih asing dengan tampilan aplikasi yang cukup rumit tersebut, termasuk juga dengan bagaimana cara save video di Adobe Premiere. Cara menyimpannya tentu tidak hanya dengan sekali tekan "save" langsung tersimpan seperti pada aplikasi lainnya.

Cara Save Adobe Premiere Menjadi Mp4
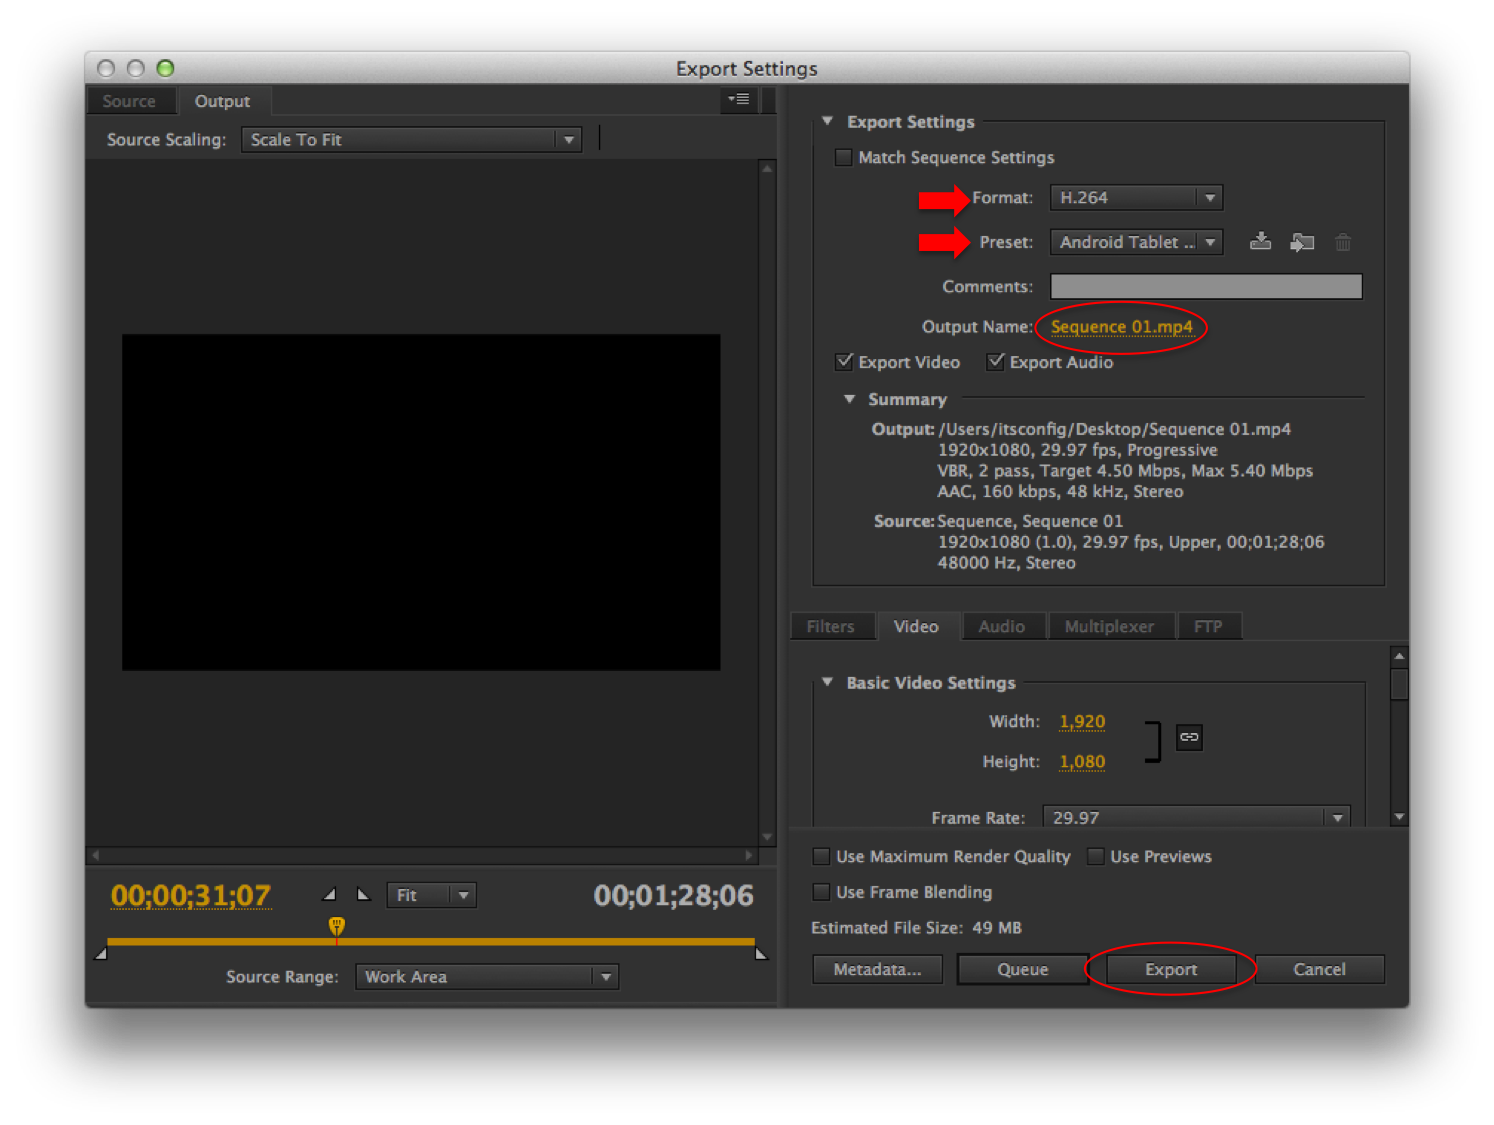
Step 1: Open the 'export' window. There are a few ways to do this, but whichever method you choose, you need to have the sequence/timeline you want to export selected. You can either navigate to File -> Export -> Media or use the shortcut below. PC: Ctrl + M. Mac: Cmd + M.
Adobe Premiere Pro CS6 Save(Export) Video [Tutorial] YouTube
Baca juga : Cara Mengatasi Audio dan Video Tidak Sinkron di Adobe Premiere Dibawah ini adalah tahapan dan cara export video Adobe Premiere untuk menghasilkan video dengan kualitas yang cemerlang yaitu:. Pilih file project premiere yang sudah selesai, kemudian pilih file menu, pilih export, dan terakhir media.Cara lainnya adalah dengan menekan tombol Ctrl+M

Cara Edit Video Rewind (Reverse) Adobe Premiere Pro YouTube
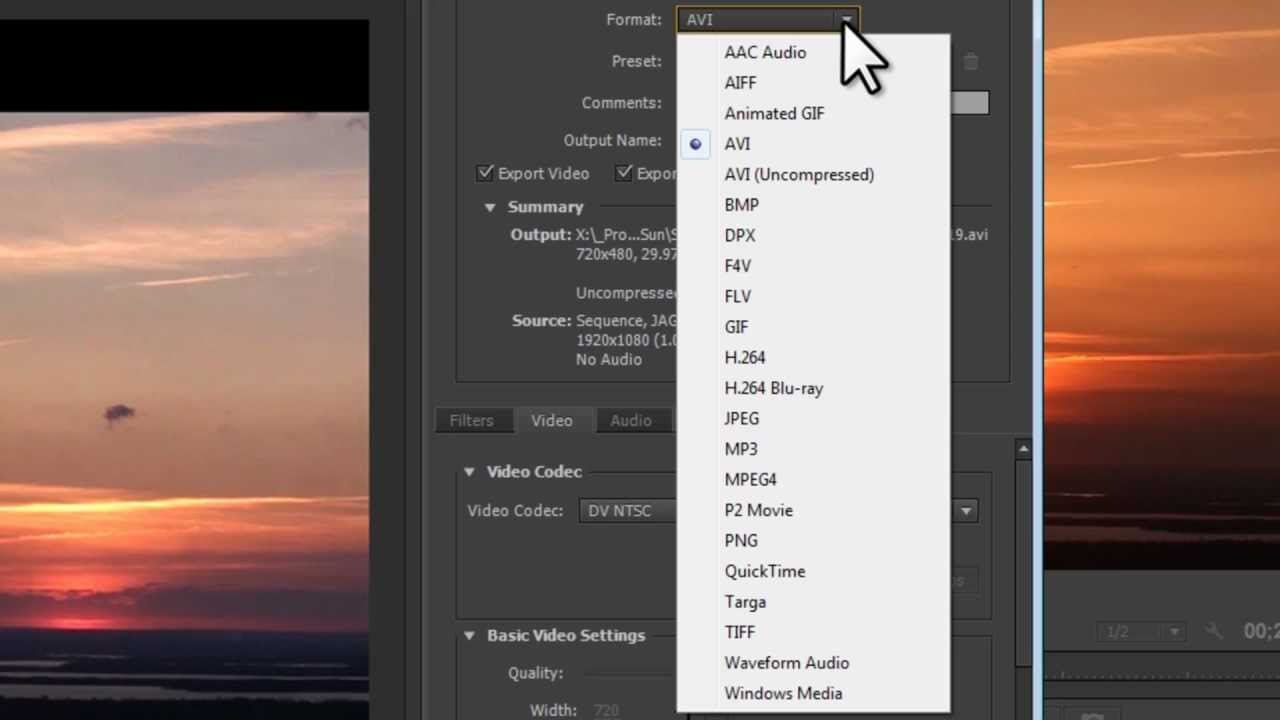
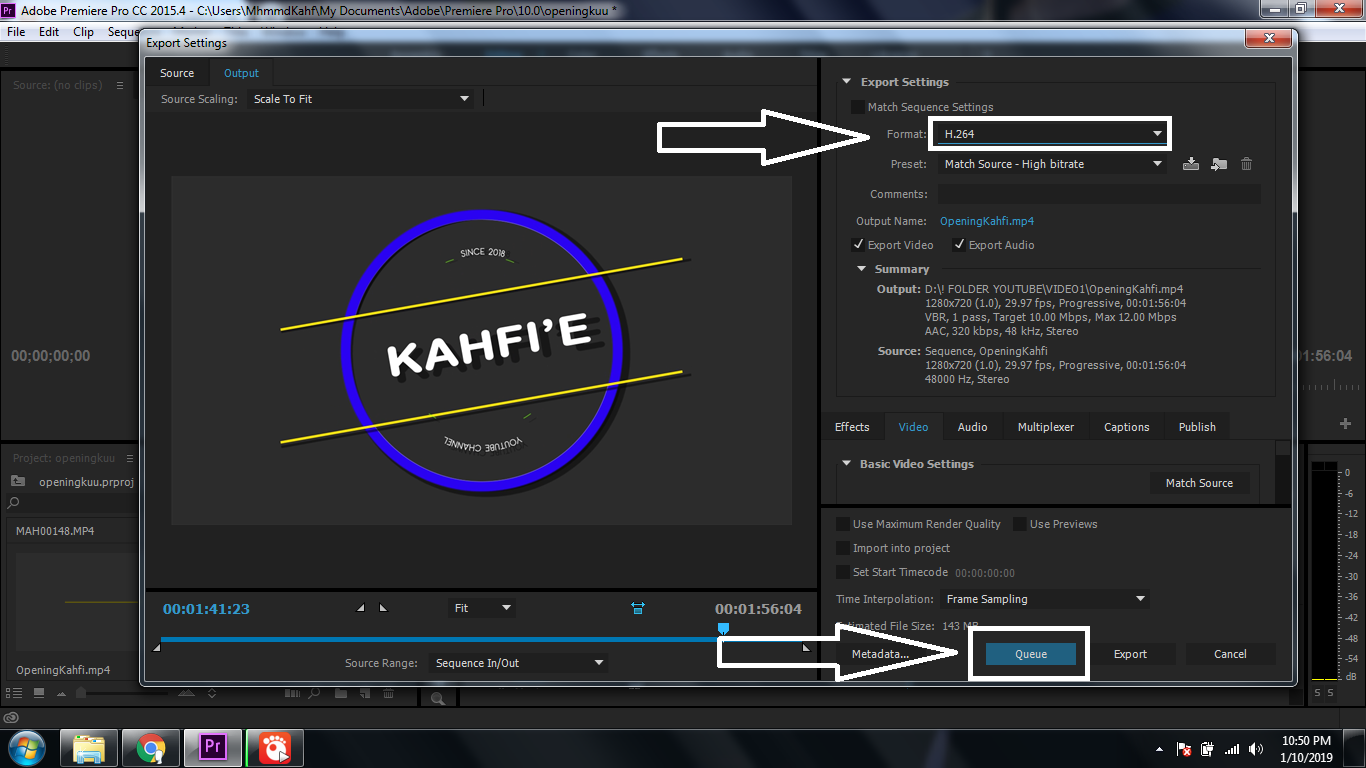
Once you finish editing your project, here's how to export the Premiere Pro file to mp4: Choose Export from the header bar at the top of Premiere Pro to open the Export workspace. Type your file name in the File Name dialog and click the Location option to specify where to save your file. Choose H.264 from the Format menu.
Cara Crop Video di Adobe Premiere Pro CC YouTube
Cara export video di Adobe Premier Pro wajib diketahui pengguna aplikasi ini agar bisa mendapatkan format video yang dapat dinikmati di perangkat apa pun. ADVERTISEMENT. Adobe Premier Pro sendiri adalah aplikasi edit video yang dapat diakses di PC. Aplikasi ini menghadirkan berbagai fitur dan sudah mendukung kualitas video 4K.

Cara Save Adobe Premiere Menjadi Mp4
Step 5: Find the Frame and Get the Shot. Play your video until you get to the frame that you want a screenshot of. At this point, press the stop button. You may also drag the blue position finder to move through the video. Now select the little camera icon to complete a screenshot.

CARA REVERSE VIDEO DI ADOBE PREMIERE PRO YouTube
Dan Instal Adobe Premiere Dengan Adobe Encoder tersebut dalam catatan penting versi-nya harus sama.. jika kamu sudah membacanya dari awal maka kita akan langsung masuk ke prakteknya guys… Cara Export Adobe Premiere Ke mp4 menggunakan Adobe Encoder. 1. Buka Aplikasi Adobe Premiere Kamu. 2. Siapkan Video Yang Sudah Kamu Edit. 3.
How To Save Adobe Premiere Project As Mp4 [ FullGuide] Renee Robyn
Step 2: Choose the sequences you want to export. Once the Project Manager has opened, you will see the Sequence pane at the top. It's populated with a list of all the sequences in your Premiere Pro project. If you have enough sequences, you will be able to scroll through the list. Click check box next to each sequence you wish to export.
Cara Memasukan Gambar Di Adobe Premiere pulp
Video Codec: H.264; Frame rate: 24, 25, 30, 48, 50, 60; Cara Export Adobe Premiere. Setelah mengetahui berbagai ukuran resolusi dan rasio dari media sosial saatnya kamu mencoba untuk membuatnya. Aplikasi yang dapat membantu kamu untuk mengatur kualitas hingga ukuran video adalah Adobe Premiere.

Saving Effect Presets In Adobe Premiere YouTube
Di bawah ini merupakan beberapa fitur yang bisa Anda manfaatkan untuk edit video: 1. Scene Edit Detection. Fitur yang satu ini terbilang cukup baru pada Adobe Premiere Pro. Nantinya, dengan memakai Scene Edit Detection tersebut maka memungkinkan pengguna dalam mengedit cuplikan video dengan cara otomatis.
5 Langkah Cara Export Adobe Premiere ZenCreator
Auto Save Default Location = File > Project Settings > Scratch Disks. With Premiere Pro Creative Cloud you are able to specify an autosave location that is different than where you are saving your main project via Scratch Disk project settings. I have attached a screenshot showing where to do this when you are setting up your scratch disks.

Cara Mengatur Sequence atau Ukuran Video di Adobe Premiere
1. Buka Menu Export. Langkah pertama, selesaikan terlebih dahulu semua proses editing yang Anda lakukan di Premiere. Cek ulang pada menu timeline video, pastikan sudah oke semua. Kalau sudah, klik menu File, kemudian pilih Export dan pilih Media. Atau Anda juga bisa klik Ctrl + M untuk membuka menu export tersebut.